> ## Documentation Index
> Fetch the complete documentation index at: https://help.heydenada.com/llms.txt
> Use this file to discover all available pages before exploring further.
# Team management
> Invite members, manage roles, and control permissions for your team
Your Denada team is the shared workspace where projects, images, libraries, and docs live. Team management lets you control who has access and what they can do.
Everything in this guide happens on the **Settings** page, which you can open from the sidebar. Everyone on the team can see Settings, but what you can change depends on your access level.
## Inviting members
To add someone to your team:
Go to **Settings** in the sidebar.
Click **Add member** at the bottom of the **Members** list and enter the person's email address.
Click **Add member** to send it. The invitee receives an email with a link to join your team (unless your team is on a demo plan, in which case they're added quietly without an email).
Until they accept, the person appears in the Members list with an **Invited** badge. New invitations start at the member access level — click the invited entry and choose **Access level** if you want to change it before they join, or **Delete invitation** to withdraw it.
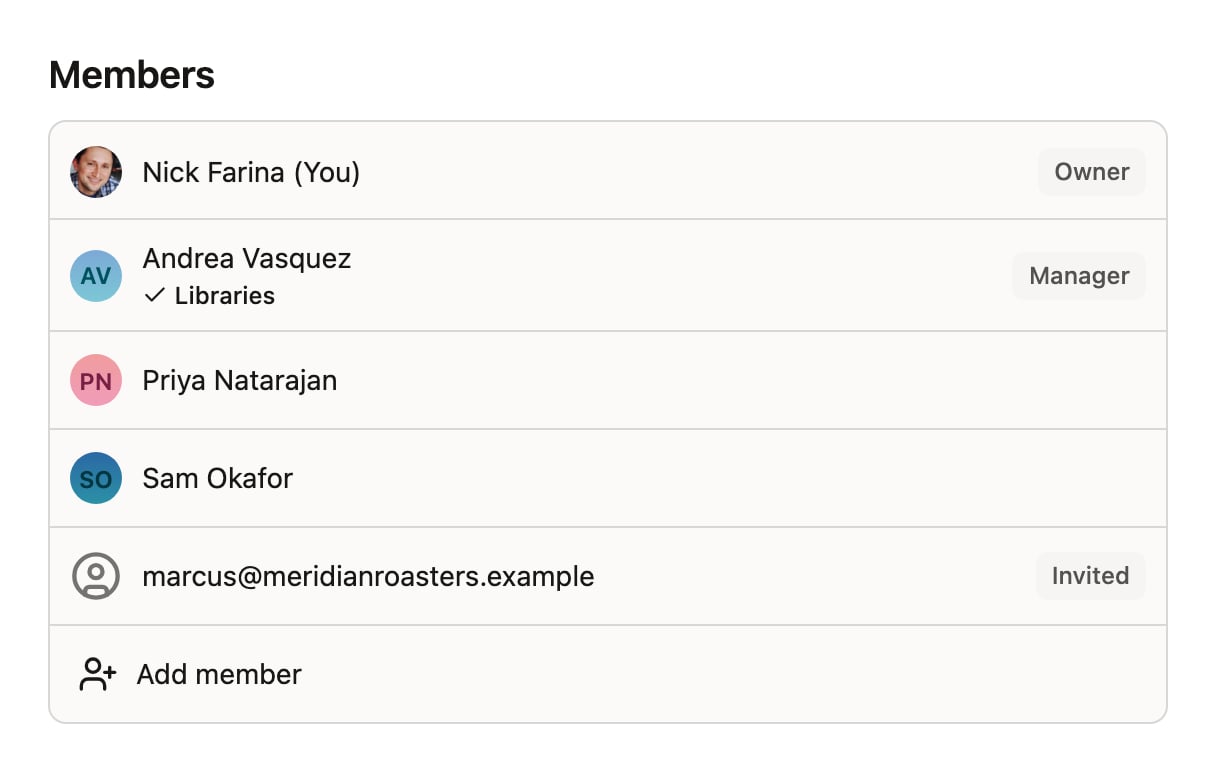 Inviting members requires manager or owner access.
## Access levels
Every team member has one of three access levels.
| Access level | What they can do |
| ------------ | --------------------------------------------------------------------------------------------------------------------------------------------------------------------------------------------------- |
| **Owner** | Can see and manage every aspect of your team, including the custom domain, and everything managers can do. |
| **Manager** | Can manage your team members — invite, remove, and change access levels (except for owners) — plus edit the team name, and manage workspace settings, integrations, single sign-on, and API tokens. |
| **Member** | Can access the team — create and edit projects, chat with Denada, and use the image library. |
A few rules to keep in mind:
* Only owners can promote someone to owner, or change an existing owner's level.
* Managers can change access levels for members and other managers, but not owners.
## Permissions
In addition to access levels, individual permissions can be toggled on or off for each member:
* **Libraries** — access to the library building system. This is **off by default** for everyone. An owner or manager must enable it for anyone who needs to create or edit library designs; it also reveals the **Libraries** and **Fonts** sections in the sidebar.
Library access is deliberately restricted. Libraries control your brand guardrails, so only team members who need to build or modify them should have this permission enabled.
## Changing a member's access level
1. Go to **Settings**.
2. Click the member in the **Members** list.
3. Click **Access level** to open the selector.
4. Choose the new level, and toggle any permissions.
The change takes effect immediately. Denada asks you to confirm before promotions and demotions that change what someone can do.
Denada does not stop you from demoting or removing the last owner — even yourself. Keep at least one owner on the team at all times, and ideally two, so someone can always administer it.
## Removing members
1. Go to **Settings**.
2. Click the member you want to remove.
3. Choose **Remove from team**.
4. Confirm with **Remove**.
Removed members immediately lose access to the team's content. Any projects or content they created remains in the team. You can also remove yourself this way — but you won't be able to rejoin without another member inviting you.
## Your account
Click your name or avatar in the app header to open your account menu. From here you can:
* **Update your profile.** Click your name to change it, or click your avatar to upload a new picture.
* **Change email address** — update the email you sign in with.
* **Manage API token** — your personal token for [connecting AI agents](/agents/connecting).
* **Sign out** of Denada.
### Multiple teams
If you belong to more than one team, they're listed under **Teams** in your account menu — click any team to switch to it. Choose **New team** to create a fresh team; you'll be its owner and can invite others to join.
## Integrations
Below the Members list, managers and owners will find the **Integrations** section, where you can connect email platforms. Click **Add integration** to set up a new connection.
[Learn more about integrations →](/integrations/integrations-overview)
## Best practices
* **Use the member role for most people.** Give manager or owner access only to people who need to administer the team.
* **Grant library access sparingly.** Only enable the **Libraries** permission for people who need to build or modify library designs.
* **Keep at least two owners.** This ensures someone can always manage the team if one owner is unavailable.
* **Review membership periodically.** Remove people who have left the organization or no longer need access.
Inviting members requires manager or owner access.
## Access levels
Every team member has one of three access levels.
| Access level | What they can do |
| ------------ | --------------------------------------------------------------------------------------------------------------------------------------------------------------------------------------------------- |
| **Owner** | Can see and manage every aspect of your team, including the custom domain, and everything managers can do. |
| **Manager** | Can manage your team members — invite, remove, and change access levels (except for owners) — plus edit the team name, and manage workspace settings, integrations, single sign-on, and API tokens. |
| **Member** | Can access the team — create and edit projects, chat with Denada, and use the image library. |
A few rules to keep in mind:
* Only owners can promote someone to owner, or change an existing owner's level.
* Managers can change access levels for members and other managers, but not owners.
## Permissions
In addition to access levels, individual permissions can be toggled on or off for each member:
* **Libraries** — access to the library building system. This is **off by default** for everyone. An owner or manager must enable it for anyone who needs to create or edit library designs; it also reveals the **Libraries** and **Fonts** sections in the sidebar.
Library access is deliberately restricted. Libraries control your brand guardrails, so only team members who need to build or modify them should have this permission enabled.
## Changing a member's access level
1. Go to **Settings**.
2. Click the member in the **Members** list.
3. Click **Access level** to open the selector.
4. Choose the new level, and toggle any permissions.
The change takes effect immediately. Denada asks you to confirm before promotions and demotions that change what someone can do.
Denada does not stop you from demoting or removing the last owner — even yourself. Keep at least one owner on the team at all times, and ideally two, so someone can always administer it.
## Removing members
1. Go to **Settings**.
2. Click the member you want to remove.
3. Choose **Remove from team**.
4. Confirm with **Remove**.
Removed members immediately lose access to the team's content. Any projects or content they created remains in the team. You can also remove yourself this way — but you won't be able to rejoin without another member inviting you.
## Your account
Click your name or avatar in the app header to open your account menu. From here you can:
* **Update your profile.** Click your name to change it, or click your avatar to upload a new picture.
* **Change email address** — update the email you sign in with.
* **Manage API token** — your personal token for [connecting AI agents](/agents/connecting).
* **Sign out** of Denada.
### Multiple teams
If you belong to more than one team, they're listed under **Teams** in your account menu — click any team to switch to it. Choose **New team** to create a fresh team; you'll be its owner and can invite others to join.
## Integrations
Below the Members list, managers and owners will find the **Integrations** section, where you can connect email platforms. Click **Add integration** to set up a new connection.
[Learn more about integrations →](/integrations/integrations-overview)
## Best practices
* **Use the member role for most people.** Give manager or owner access only to people who need to administer the team.
* **Grant library access sparingly.** Only enable the **Libraries** permission for people who need to build or modify library designs.
* **Keep at least two owners.** This ensures someone can always manage the team if one owner is unavailable.
* **Review membership periodically.** Remove people who have left the organization or no longer need access.