> ## Documentation Index
> Fetch the complete documentation index at: https://help.heydenada.com/llms.txt
> Use this file to discover all available pages before exploring further.
# Salesforce Marketing Cloud
> Push finished emails from Denada to Salesforce Marketing Cloud
Denada integrates with [Salesforce Marketing Cloud](https://www.salesforce.com/marketing/email/) so you can design emails in Denada and push them directly into SFMC's Content Builder.
## What you need
* A Denada project with an email ready to push
* A Salesforce Marketing Cloud account with administrative permissions (to create an Installed Package)
## Step 1: Configure an SFMC Installed Package
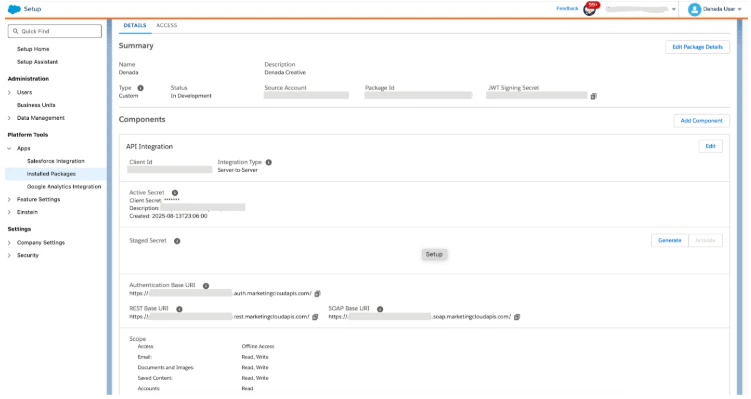
Create a dedicated package in SFMC for the Denada integration:
1. Log in to your Salesforce Marketing Cloud account.
2. Navigate to **Setup**.
3. Under Platform Tools, select **Apps**, then click **Installed Packages**.
4. Click **New** to create a new package.
5. Name the package "Denada Integration" and provide a description (e.g., "Package for Denada SFMC data synchronization").
6. Click **Save**.
7. Under the new package details, click **Add Component**.
8. Set the component type to **API Integration**, then choose **Server-to-Server**.
9. Define the required permissions:
* Documents & Images: **Read, Write**
* Assets: **Read, Write**
* Saved Content: **Read, Write**
* Email: **Read, Write**
* Provisioning Accounts: **Read**
10. Click **Save**.
11. Copy the **Client ID** and **Client Secret** generated for this component — you will need them in the next step.
 ## Step 2: Connect Denada to Salesforce
1. In Denada, open your team's **Settings** page, find the **Integrations** panel, and click **Add integration** (manager access required). You can also get there from any project via **Share > Integrations > Configure**.
2. Select **Salesforce** from the list.
3. Enter the following details:
| Field | Value |
| -------------------------------- | --------------------------------------------------------------------------------------------------------------------------------------------------------------------------- |
| **Name** | Optional — your account or business unit name |
| **Client ID** | Paste the Client ID from step 1 |
| **Client secret** | Paste the Client Secret from step 1 |
| **Tenant subdomain** | The character string at the beginning of your Authentication Base URI (e.g., `mc8hsin3bsibtisb-t36toe` from `https://mc8hsin3bsibtisb-t36toe.auth.marketingcloudapis.com/`) |
| **Business Unit MID (optional)** | Your SFMC Business Unit MID — found in the dropdown under your company name in the top-right corner of SFMC |
| **Default folder** | The Content Builder folder where Denada emails are placed by default. Many teams create a folder called "Denada" — you can make one from the picker with **Create folder** |
4. Click **Validate** to ensure the integration is working.
5. Click **Save**.
## Push an email to Salesforce
When you are ready to send a project to SFMC:
1. Open the project and click **Share**.
2. Under **Integrations**, select **Export to Salesforce** (if you have several Salesforce configurations, each appears with its configuration name).
3. Choose the destination Content Builder folder (defaults to your configured default folder, but you can pick a different one).
4. Give the asset a name — this is how it will appear in Content Builder.
5. Choose your upload type:
* **Upload HTML only** — uploads HTML with Denada-hosted images. The fastest option.
* **Upload images to same folder** — uploads HTML and hosts your images in SFMC, replacing image URLs in the HTML with SFMC-hosted URLs. All files go in one folder.
* **Upload images to subfolder** — same as above, but images are placed in a nested subfolder (you choose its name) to keep things organized.
6. Click **Export here**.
## Step 2: Connect Denada to Salesforce
1. In Denada, open your team's **Settings** page, find the **Integrations** panel, and click **Add integration** (manager access required). You can also get there from any project via **Share > Integrations > Configure**.
2. Select **Salesforce** from the list.
3. Enter the following details:
| Field | Value |
| -------------------------------- | --------------------------------------------------------------------------------------------------------------------------------------------------------------------------- |
| **Name** | Optional — your account or business unit name |
| **Client ID** | Paste the Client ID from step 1 |
| **Client secret** | Paste the Client Secret from step 1 |
| **Tenant subdomain** | The character string at the beginning of your Authentication Base URI (e.g., `mc8hsin3bsibtisb-t36toe` from `https://mc8hsin3bsibtisb-t36toe.auth.marketingcloudapis.com/`) |
| **Business Unit MID (optional)** | Your SFMC Business Unit MID — found in the dropdown under your company name in the top-right corner of SFMC |
| **Default folder** | The Content Builder folder where Denada emails are placed by default. Many teams create a folder called "Denada" — you can make one from the picker with **Create folder** |
4. Click **Validate** to ensure the integration is working.
5. Click **Save**.
## Push an email to Salesforce
When you are ready to send a project to SFMC:
1. Open the project and click **Share**.
2. Under **Integrations**, select **Export to Salesforce** (if you have several Salesforce configurations, each appears with its configuration name).
3. Choose the destination Content Builder folder (defaults to your configured default folder, but you can pick a different one).
4. Give the asset a name — this is how it will appear in Content Builder.
5. Choose your upload type:
* **Upload HTML only** — uploads HTML with Denada-hosted images. The fastest option.
* **Upload images to same folder** — uploads HTML and hosts your images in SFMC, replacing image URLs in the HTML with SFMC-hosted URLs. All files go in one folder.
* **Upload images to subfolder** — same as above, but images are placed in a nested subfolder (you choose its name) to keep things organized.
6. Click **Export here**.
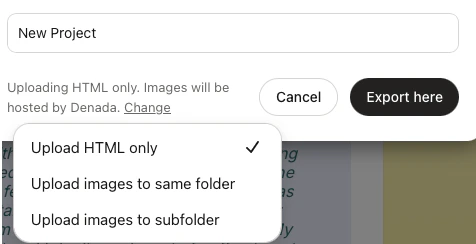 If you are unsure which upload type to use, **Upload images to subfolder** is the simplest option and works well for most teams.
## How updates work
Before exporting, Denada checks the destination folder for assets with the same names (the email itself, and any images being uploaded). If there are matches, you'll see a **Replace existing assets?** confirmation listing what will be updated — confirm to replace them in place, or go back and change the folder or asset name. Re-exporting with the same name and folder updates the same Content Builder assets rather than creating duplicates.
## Troubleshooting
Make sure you are using a **Server-to-Server** API integration, not a Web App or Public App type. Double-check that the Client ID, Client Secret, and Tenant subdomain are correct.
Verify that your Installed Package has the required permissions: Documents & Images, Assets, Saved Content, and Email all need Read and Write access.
If you chose **Upload HTML only**, images are hosted by Denada and should display automatically. If you chose one of the SFMC-hosted options, check that the Assets permission includes Write access.
For general information about how integrations work, see [Integrations overview](/integrations/integrations-overview).
## Need help?
If you run into issues with the Salesforce integration, reach out to [support@heydenada.com](mailto:support@heydenada.com) or ask in our [Community Slack](https://join.slack.com/t/denadacommunity/shared_invite/zt-33ermqnvl-kU9677V0eloK5Jf2SSNO5g).
If you are unsure which upload type to use, **Upload images to subfolder** is the simplest option and works well for most teams.
## How updates work
Before exporting, Denada checks the destination folder for assets with the same names (the email itself, and any images being uploaded). If there are matches, you'll see a **Replace existing assets?** confirmation listing what will be updated — confirm to replace them in place, or go back and change the folder or asset name. Re-exporting with the same name and folder updates the same Content Builder assets rather than creating duplicates.
## Troubleshooting
Make sure you are using a **Server-to-Server** API integration, not a Web App or Public App type. Double-check that the Client ID, Client Secret, and Tenant subdomain are correct.
Verify that your Installed Package has the required permissions: Documents & Images, Assets, Saved Content, and Email all need Read and Write access.
If you chose **Upload HTML only**, images are hosted by Denada and should display automatically. If you chose one of the SFMC-hosted options, check that the Assets permission includes Write access.
For general information about how integrations work, see [Integrations overview](/integrations/integrations-overview).
## Need help?
If you run into issues with the Salesforce integration, reach out to [support@heydenada.com](mailto:support@heydenada.com) or ask in our [Community Slack](https://join.slack.com/t/denadacommunity/shared_invite/zt-33ermqnvl-kU9677V0eloK5Jf2SSNO5g).