> ## Documentation Index
> Fetch the complete documentation index at: https://help.heydenada.com/llms.txt
> Use this file to discover all available pages before exploring further.
# Project options
> Rename, preview, lock, export, and manage your project settings
Project-level settings live in two places: the **⋯** menu in the top-right corner of the editor, and the **Options** tab in the sidebar (Ctrl+5).
## The ⋯ menu
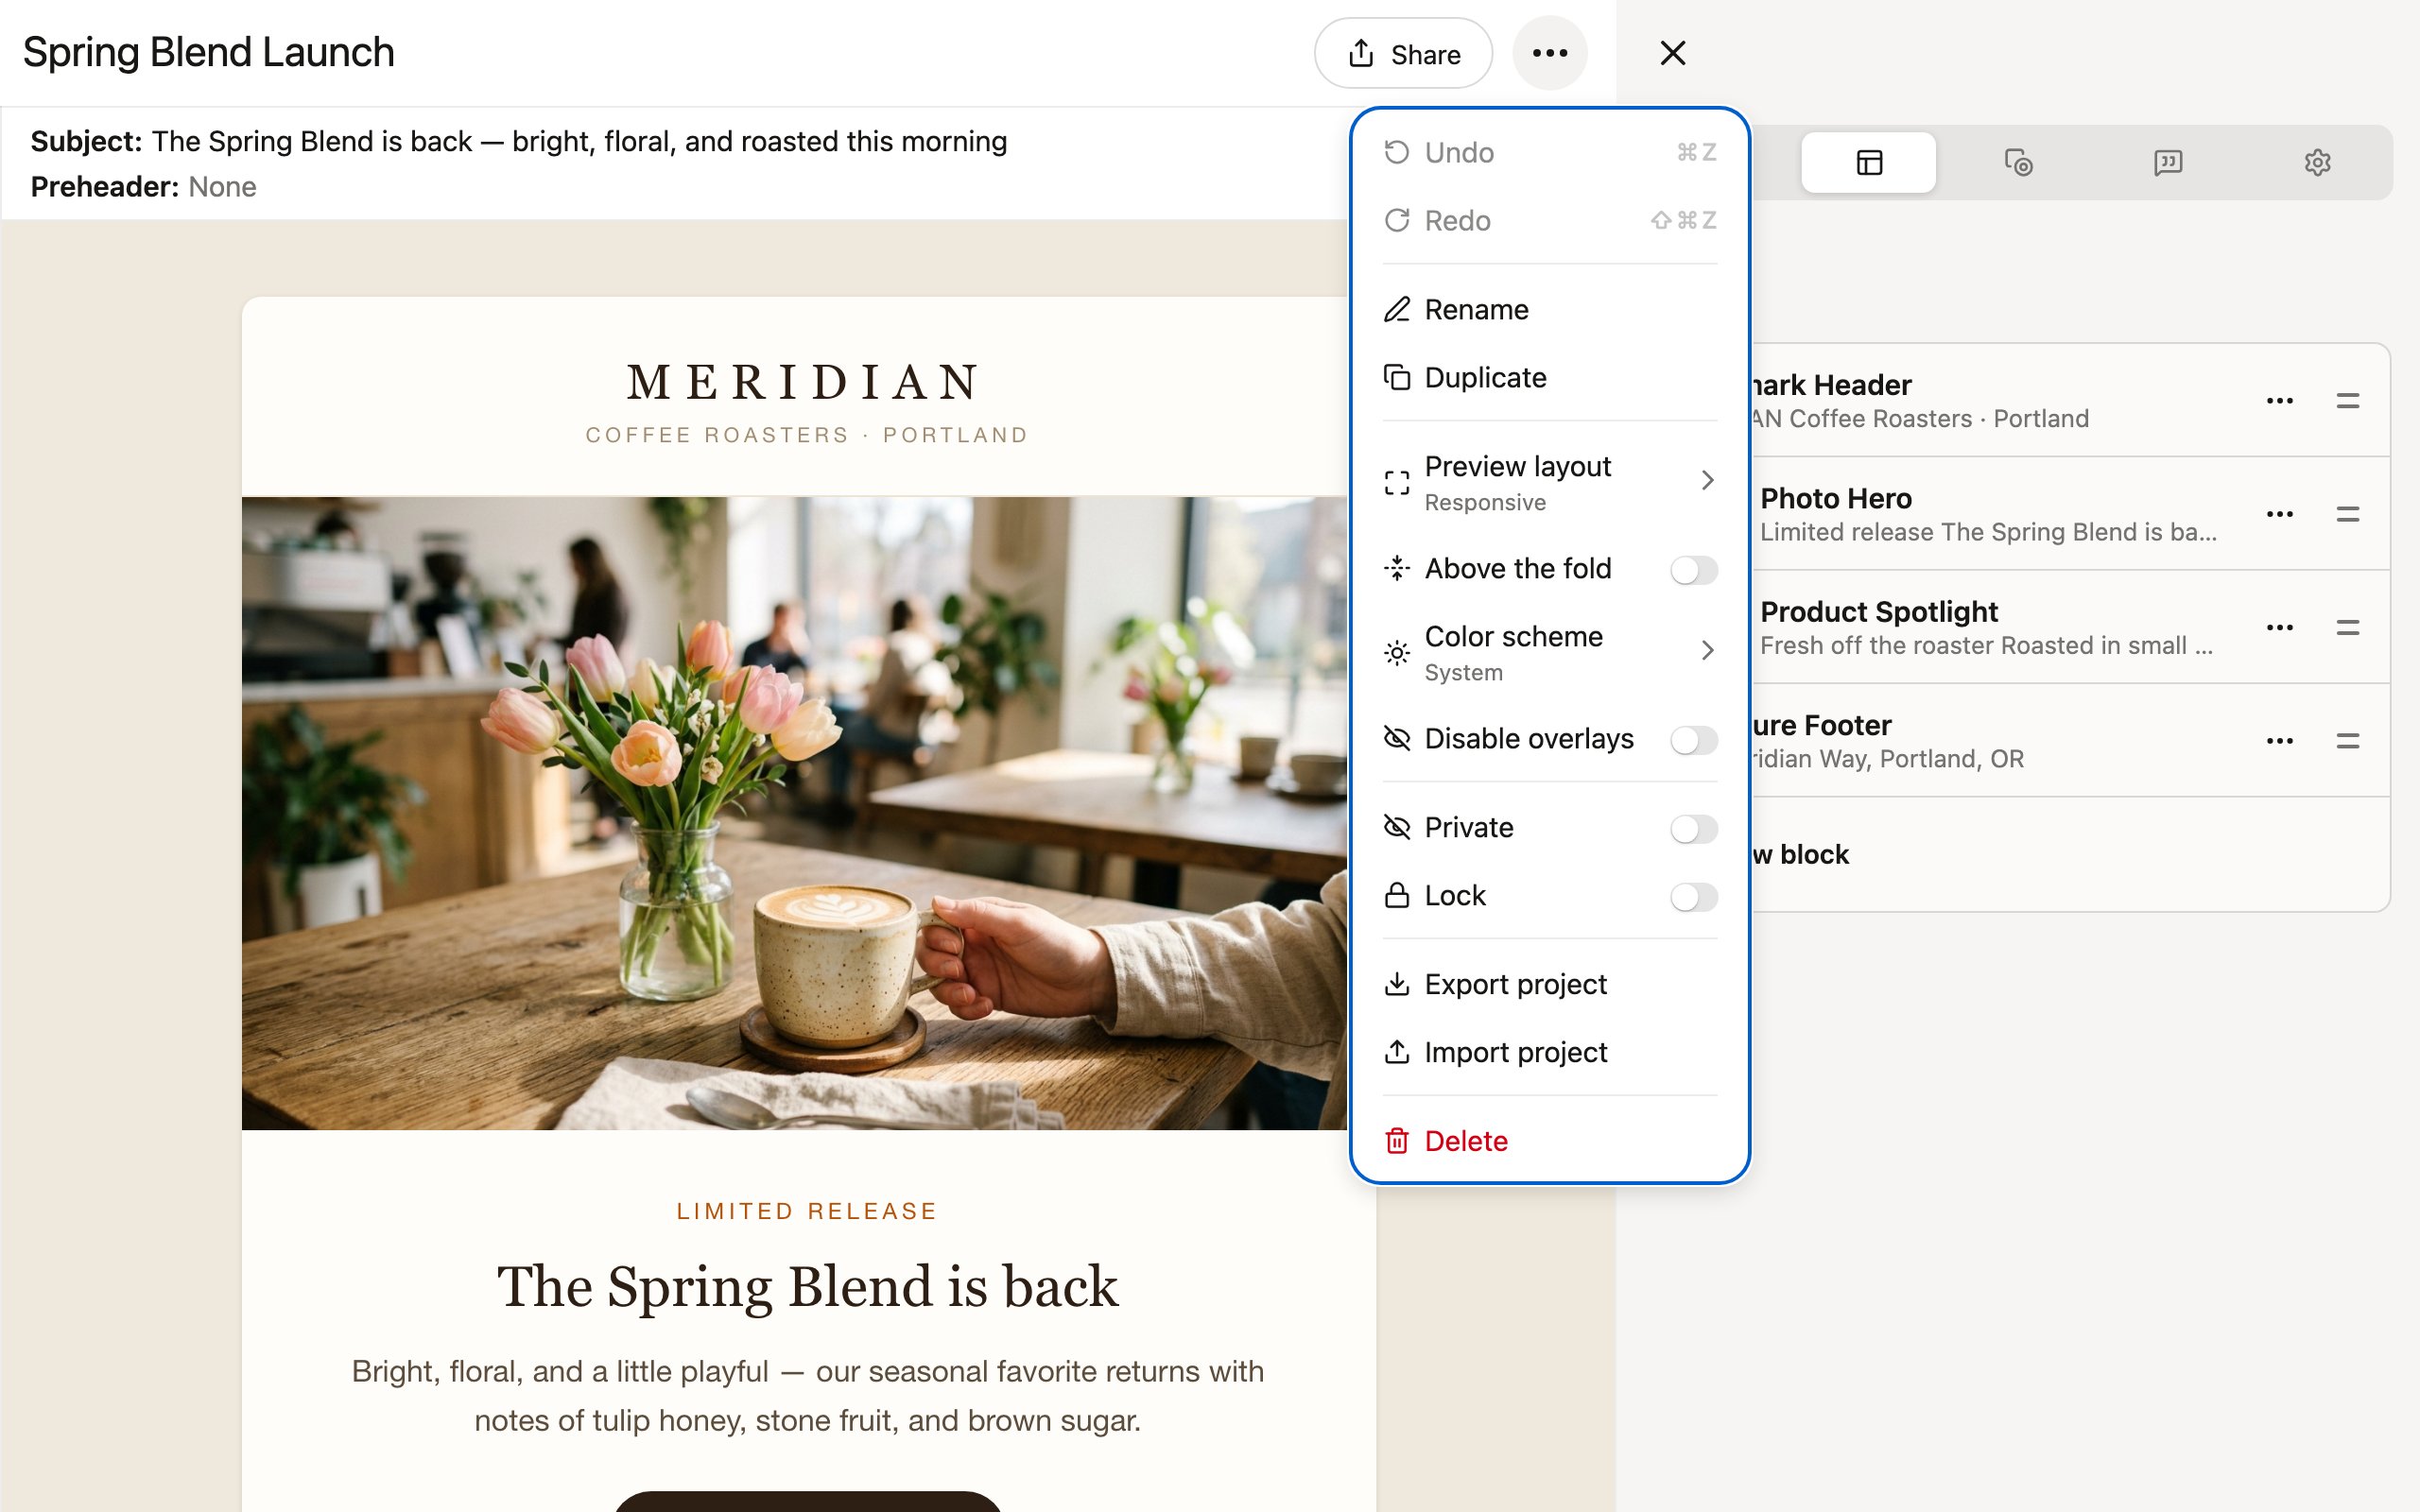 ### Undo / Redo
Quick access to undo and redo, with keyboard shortcuts shown (Cmd+Z / Cmd+Shift+Z on Mac, Ctrl+Z / Ctrl+Y on Windows). The menu items describe the change they will undo or redo.
### Rename
Change the name of your project. This is the title shown in the Projects list and at the top of the editor.
### Duplicate
Create a copy of the entire project, including all blocks and parameter values. If the project has variations, a checkbox lets you include them in the copy — otherwise they can be regenerated later.
### Preview layout
Control how the preview renders on the left side of the editor:
* **Responsive** (default) — the preview adapts to the width of your editor window, giving you a realistic sense of how the email will look.
* **Desktop** — fixed 1280px-wide preview.
* **Tablet** — fixed 800px-wide preview.
* **Mobile** — fixed 375px-wide preview.
When a fixed breakpoint is wider than your window, a **View full size** toggle expands the preview to its true pixel size. **Cycle layouts** (Cmd+Shift+F, or Ctrl+Shift+F on Windows) steps through the breakpoints.
### Above the fold
Overlay dashed guides showing the approximate fold in popular email clients (or browser sizes, for landing pages) — a rough gut-check for what recipients see before scrolling. Toggle with Ctrl+F. See the [editor interface](/editor/editor-interface) for details.
### Color scheme
Switch the preview between **Light** and **Dark** to see how your email renders in clients that support dark mode. **System** (the default) follows your OS preference.
### Disable overlays
Turn off the block selection overlays and hover indicators on the preview (Ctrl+O). This lets you click on elements in the rendered preview directly — useful when you want a clean view without any editor UI on top.
### Private
Hide this project from your team in the Projects area. Only you (and admins) can see a private project.
### Lock
Prevent the project's content from being edited. This is useful when a project is out for review or has been finalized — comments can still be added, but no one can accidentally change the content. Toggle the lock off when you need to make changes again.
### Export project
Download the project as a `.project` file that can be imported into another team.
### Import project
Replace this project's contents with an uploaded `.project` file, keeping its current library. A version of the current state is saved first so you can restore it later.
### Delete
Permanently delete the project. This removes it from the Projects list.
Deleting a project cannot be undone. Make sure you have exported or backed up anything you need before deleting.
## The Options tab
The **Options** tab in the sidebar holds content-level settings.
### Email options
For email projects, the tab is titled **Email options** and includes:
* **Subject** — the email's subject line.
* **Preheader** — the preview text shown after the subject in most inboxes.
* **Tracking** — click to open the UTM parameters dialog, where you can set Source, Medium, and Campaign values. When enabled, UTM parameters are added to all links in the email, and per-link Content and Term fields become available in the [Edit link dialog](/editor/working-with-blocks).
Landing page projects don't have a subject, preheader, or tracking section.
### Theme
If your library exposes project-wide theme parameters (colors, fonts, and so on), they appear here under a **Theme** heading.
### Versions
Click **View history** to browse and restore previous versions of the project.
Version history requires the Team plan — on other plans this cell reads **Upgrade to view history**.
[Learn more about version history](/editor/version-history)
### Library
Shows which library (and version) the project is built on. Click it for library actions:
* **Change library** — switch to a different library without losing your changes. Your blocks are matched up by name where possible.
* **Change version** — pin the project to a specific version of the library, or track the latest draft.
* **Update** — pull in the latest library changes. This item only appears when an update is available; a blue **Update available** badge shows on the library cell and a notification dot appears on the Options tab itself so you don't miss it.
* **View library** — open the library in a new tab (shown if you have library permissions).
[Learn more about libraries](/libraries/using-libraries)
### Undo / Redo
Quick access to undo and redo, with keyboard shortcuts shown (Cmd+Z / Cmd+Shift+Z on Mac, Ctrl+Z / Ctrl+Y on Windows). The menu items describe the change they will undo or redo.
### Rename
Change the name of your project. This is the title shown in the Projects list and at the top of the editor.
### Duplicate
Create a copy of the entire project, including all blocks and parameter values. If the project has variations, a checkbox lets you include them in the copy — otherwise they can be regenerated later.
### Preview layout
Control how the preview renders on the left side of the editor:
* **Responsive** (default) — the preview adapts to the width of your editor window, giving you a realistic sense of how the email will look.
* **Desktop** — fixed 1280px-wide preview.
* **Tablet** — fixed 800px-wide preview.
* **Mobile** — fixed 375px-wide preview.
When a fixed breakpoint is wider than your window, a **View full size** toggle expands the preview to its true pixel size. **Cycle layouts** (Cmd+Shift+F, or Ctrl+Shift+F on Windows) steps through the breakpoints.
### Above the fold
Overlay dashed guides showing the approximate fold in popular email clients (or browser sizes, for landing pages) — a rough gut-check for what recipients see before scrolling. Toggle with Ctrl+F. See the [editor interface](/editor/editor-interface) for details.
### Color scheme
Switch the preview between **Light** and **Dark** to see how your email renders in clients that support dark mode. **System** (the default) follows your OS preference.
### Disable overlays
Turn off the block selection overlays and hover indicators on the preview (Ctrl+O). This lets you click on elements in the rendered preview directly — useful when you want a clean view without any editor UI on top.
### Private
Hide this project from your team in the Projects area. Only you (and admins) can see a private project.
### Lock
Prevent the project's content from being edited. This is useful when a project is out for review or has been finalized — comments can still be added, but no one can accidentally change the content. Toggle the lock off when you need to make changes again.
### Export project
Download the project as a `.project` file that can be imported into another team.
### Import project
Replace this project's contents with an uploaded `.project` file, keeping its current library. A version of the current state is saved first so you can restore it later.
### Delete
Permanently delete the project. This removes it from the Projects list.
Deleting a project cannot be undone. Make sure you have exported or backed up anything you need before deleting.
## The Options tab
The **Options** tab in the sidebar holds content-level settings.
### Email options
For email projects, the tab is titled **Email options** and includes:
* **Subject** — the email's subject line.
* **Preheader** — the preview text shown after the subject in most inboxes.
* **Tracking** — click to open the UTM parameters dialog, where you can set Source, Medium, and Campaign values. When enabled, UTM parameters are added to all links in the email, and per-link Content and Term fields become available in the [Edit link dialog](/editor/working-with-blocks).
Landing page projects don't have a subject, preheader, or tracking section.
### Theme
If your library exposes project-wide theme parameters (colors, fonts, and so on), they appear here under a **Theme** heading.
### Versions
Click **View history** to browse and restore previous versions of the project.
Version history requires the Team plan — on other plans this cell reads **Upgrade to view history**.
[Learn more about version history](/editor/version-history)
### Library
Shows which library (and version) the project is built on. Click it for library actions:
* **Change library** — switch to a different library without losing your changes. Your blocks are matched up by name where possible.
* **Change version** — pin the project to a specific version of the library, or track the latest draft.
* **Update** — pull in the latest library changes. This item only appears when an update is available; a blue **Update available** badge shows on the library cell and a notification dot appears on the Options tab itself so you don't miss it.
* **View library** — open the library in a new tab (shown if you have library permissions).
[Learn more about libraries](/libraries/using-libraries)