> ## Documentation Index
> Fetch the complete documentation index at: https://help.heydenada.com/llms.txt
> Use this file to discover all available pages before exploring further.
# Editor interface
> Refine and perfect your projects with Denada's block-based editor
The editor is where you refine and polish your project into an export-ready email or landing page. Chat and the editor live side by side in the same project view, giving you precise control over every block, parameter, and design detail while keeping you within your brand guidelines.
 ## Editor layout
The editor is organized into two main areas:
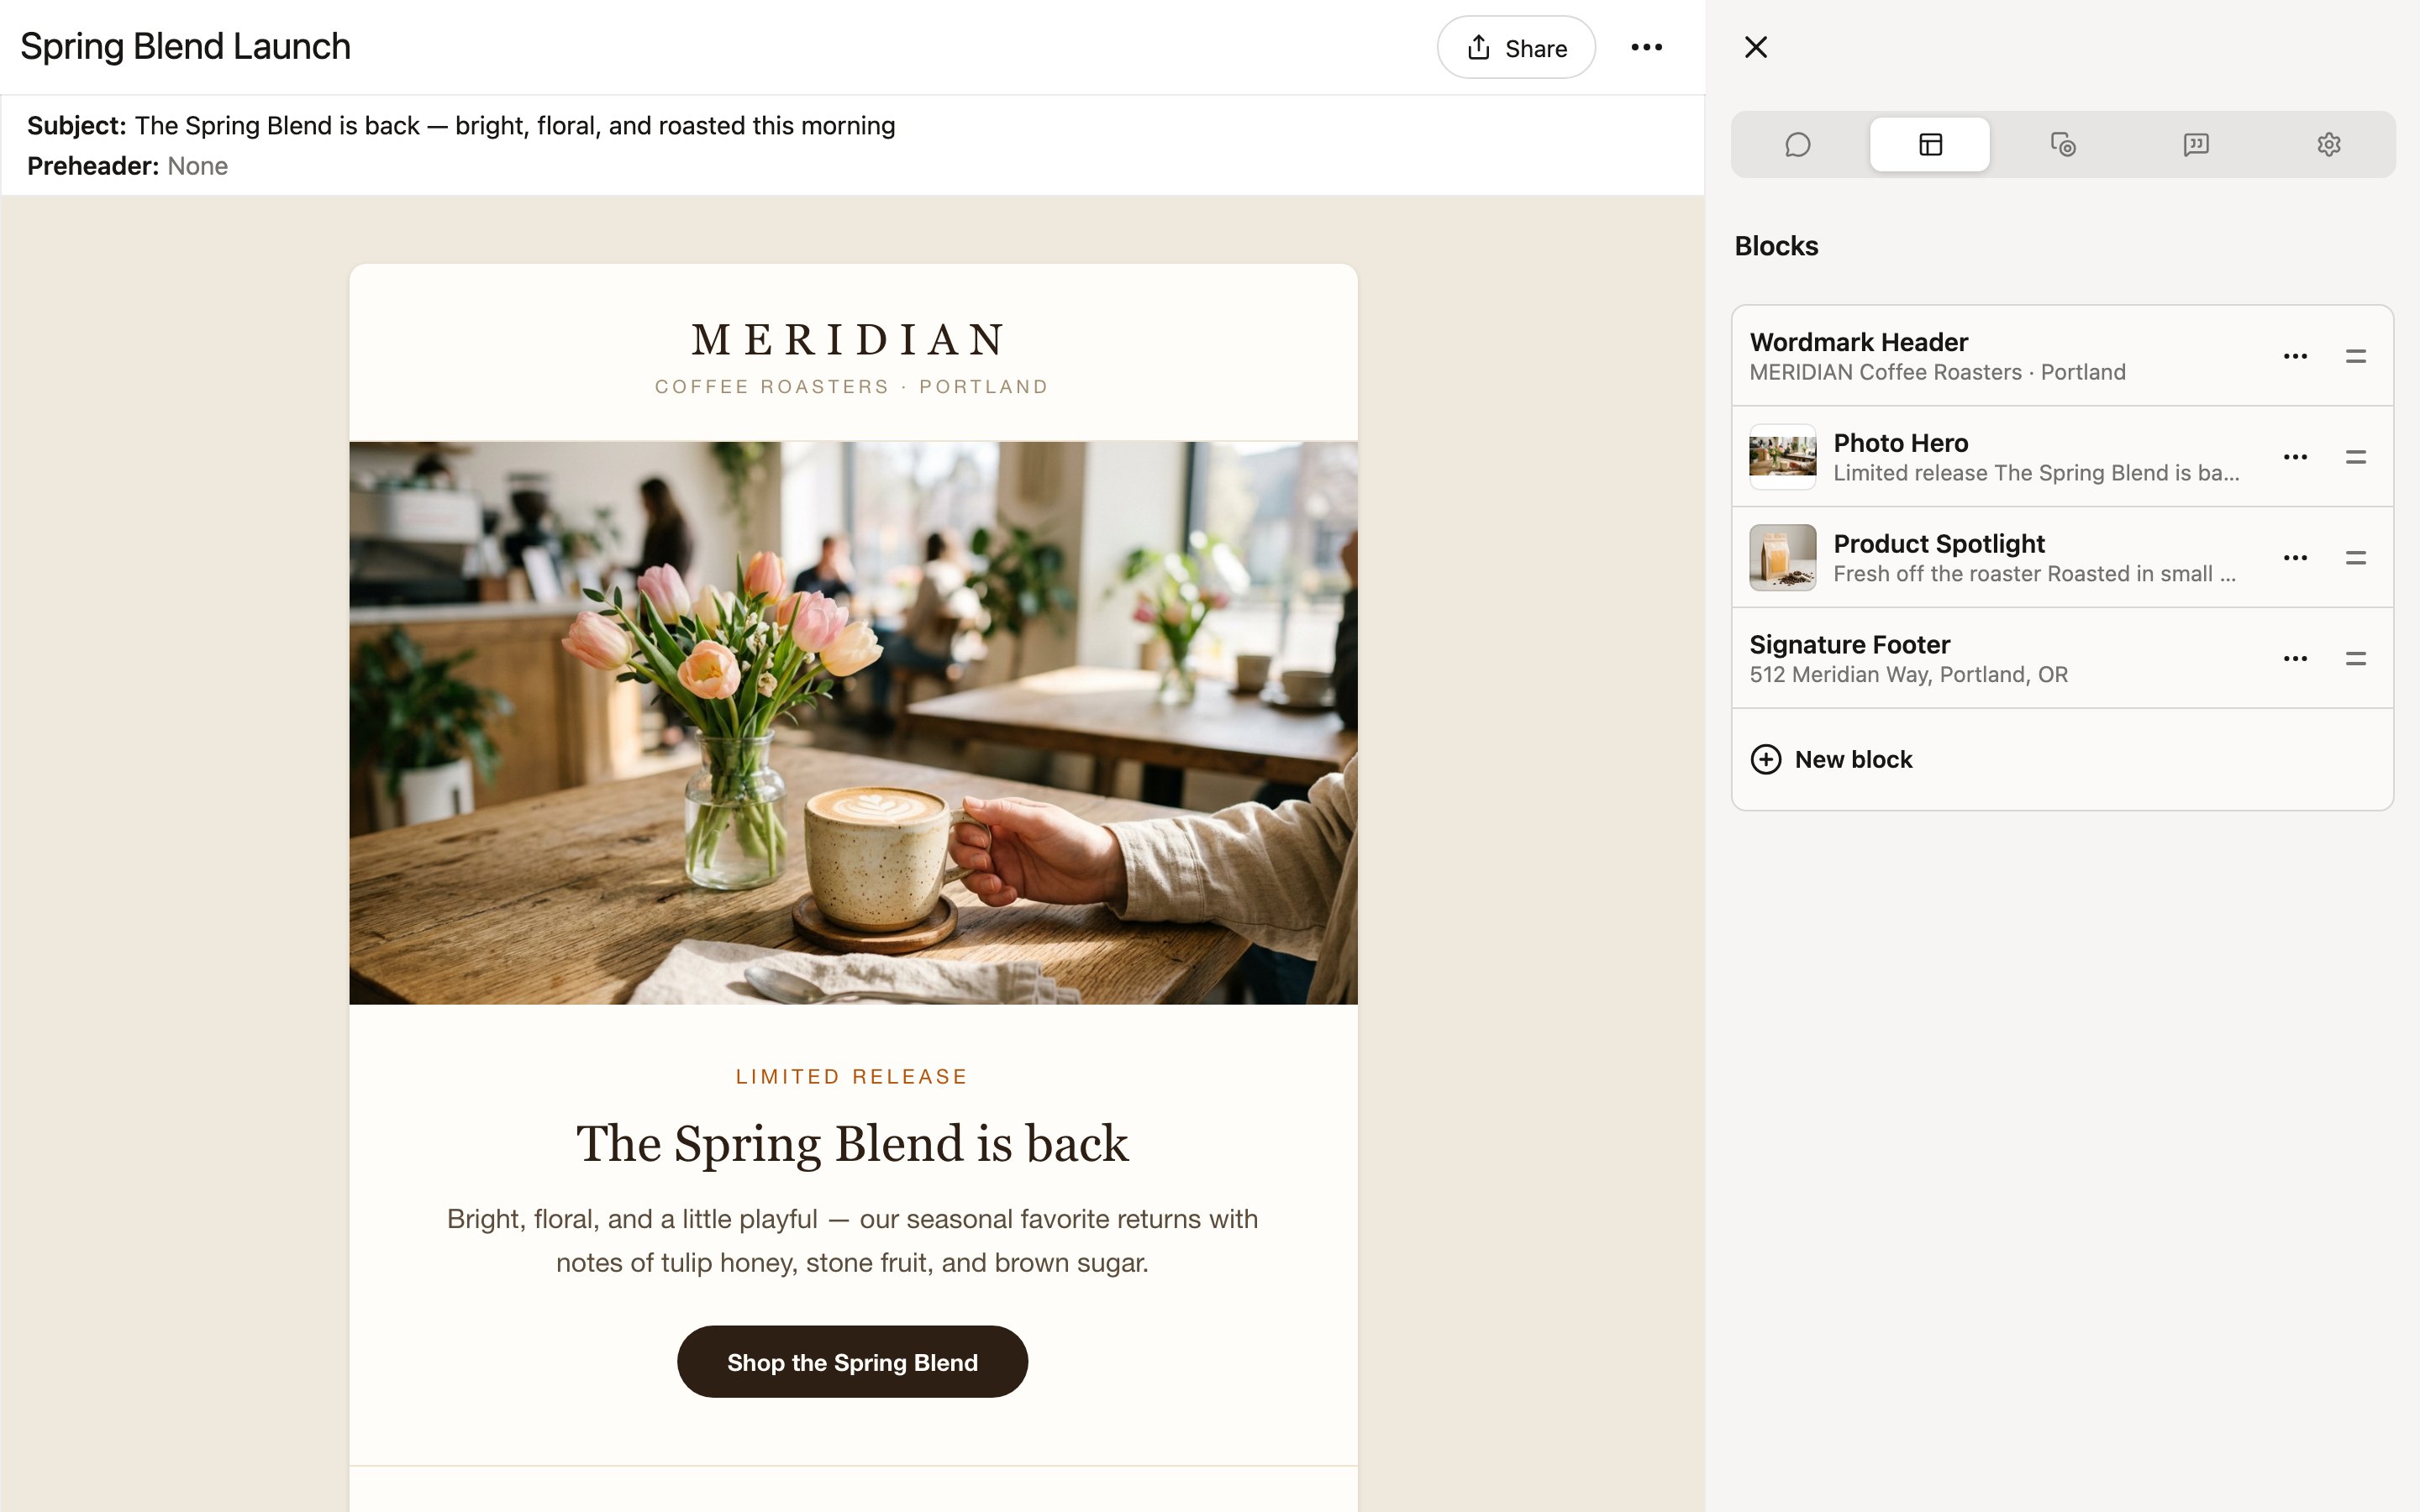
* **Preview area (left)** -- a live rendering of your project that updates as you make changes. Email projects show the subject and preheader at the top, and the toolbar includes a **Share** button and a **⋯** menu for additional actions.
* **Sidebar (right)** -- a panel with tabs for **Chat**, **Edit**, **Variations**, **Comments**, and **Options**. Switch between these tabs to iterate on your project from different angles.
Each sidebar tab has a keyboard shortcut: Ctrl+1 (Chat), Ctrl+2 (Edit), Ctrl+3 (Variations), Ctrl+4 (Comments), and Ctrl+5 (Options).
## Getting content into the editor
There are three ways to start working on a project:
1. **Create a new project with chat** -- click **+ New** in the top-right corner and choose **New project**. Describe what you need in the chat, and Denada builds the project in the preview area.
2. **Create a new project manually** -- click **Skip and go to editor** from the chat screen to start with a blank project. You will see an empty preview area with an **Add first block…** button, and the Edit tab will show a **New block** button. Click either one to start adding blocks from your library.
3. **Open an existing project** -- select any previously saved project from the Projects list in the left sidebar.
[Learn more about creating projects](/creating/new-projects)
## Block-based editing
Projects in Denada are built from **blocks**. Each block is a self-contained section -- a hero image, a text section, a call-to-action button, a footer, and so on. Blocks expose **parameters** that you can edit, such as:
* Headline and body text.
* Images and alt text.
* Button labels and URLs.
* Background colors and spacing.
To edit a block, select it in the preview area or choose it from the blocks list in the **Edit** tab. The sidebar will display all of the editable parameters for that block. Your brand guidelines determine which parameters are exposed -- style properties that should stay consistent are locked down by the project's library.
You can reorder, add, or remove blocks to change the structure of your project. Look for the block controls in the Edit tab.
## Sidebar tabs
The right sidebar contains several tabs:
Continue your conversation with Denada without leaving the editor. Ask for changes, request new sections, or refine the project through natural language. Denada applies changes directly to the project in the preview area.
[Learn more about the chat interface](/creating/chat-interface)
Browse and manage the blocks that make up your project. Add new blocks from your library, reorder them, or remove blocks you do not need. Select a block to see its editable parameters -- text, images, links, colors, and more.
[Learn more about working with blocks](/editor/working-with-blocks)
Generate multiple versions of your project automatically. Variations let you explore different copy, tone, or layout options and export them all at once for translations, personas, or A/B testing.
[Learn more about variations](/editor/variations)
Leave internal notes for your team or collect feedback from external reviewers. Comments can be tied to specific blocks and toggled between public and private visibility.
[Learn more about comments and collaboration](/editor/comments-and-collaboration)
Project-level settings: the subject, preheader, and UTM tracking for email projects, theme parameters, version history, and the library your project is built on.
[See the full Options reference](/editor/project-options)
## Preview layouts
The **⋯** menu's **Preview layout** submenu switches the preview between four breakpoints:
* **Responsive** (default) -- the preview fills the available width of your editor window.
* **Desktop** -- fixed 1280px-wide preview.
* **Tablet** -- fixed 800px-wide preview.
* **Mobile** -- fixed 375px-wide preview.
Press Cmd+Shift+F (Ctrl+Shift+F on Windows) to cycle through the layouts without opening the menu. This is especially useful for checking that images, text wrapping, and button sizing look right across screen sizes.
### Above the fold
Toggle **Above the fold** in the **⋯** menu (or press Ctrl+F) to overlay dashed guides showing roughly how much content is visible before scrolling. For email projects, the guides mark the approximate fold in popular clients like Apple Mail, Gmail, and Outlook, on both desktop and mobile. For landing pages, the guides reflect common browser window sizes instead.
For email projects, the same toggle also covers the envelope: when your subject line or preheader runs longer than a client typically displays, a dashed marker labeled with the client's name appears at the cutoff point in the header above the preview. The markers follow the selected preview layout, so switching to **Mobile** shows you where mobile inboxes would truncate your subject.
Treat all of these guides as a gut-check, not a guarantee -- real clients vary by device, window size, and version.
## AI chat in the editor
You do not have to leave the editor to make AI-powered changes. Switch to the **Chat** tab in the right sidebar and ask Denada to update your project -- for example, "Make the headline shorter" or "Swap the hero image for something with a blue background." Changes are applied directly to the project in the preview area.
## Sharing and exporting
When your project is ready, click the **Share** button in the toolbar. From there you can publish to the web, send proof emails, export in multiple formats (image, PDF, ZIP, CSV, JSON, Figma), copy or save the HTML, and push directly to connected email platforms.
[Learn more about export formats](/exporting/export-formats)
Once you are in the editor, you are in full control. Denada will not make changes to your project unless you explicitly ask it to through the Chat tab.
## Editor layout
The editor is organized into two main areas:
* **Preview area (left)** -- a live rendering of your project that updates as you make changes. Email projects show the subject and preheader at the top, and the toolbar includes a **Share** button and a **⋯** menu for additional actions.
* **Sidebar (right)** -- a panel with tabs for **Chat**, **Edit**, **Variations**, **Comments**, and **Options**. Switch between these tabs to iterate on your project from different angles.
Each sidebar tab has a keyboard shortcut: Ctrl+1 (Chat), Ctrl+2 (Edit), Ctrl+3 (Variations), Ctrl+4 (Comments), and Ctrl+5 (Options).
## Getting content into the editor
There are three ways to start working on a project:
1. **Create a new project with chat** -- click **+ New** in the top-right corner and choose **New project**. Describe what you need in the chat, and Denada builds the project in the preview area.
2. **Create a new project manually** -- click **Skip and go to editor** from the chat screen to start with a blank project. You will see an empty preview area with an **Add first block…** button, and the Edit tab will show a **New block** button. Click either one to start adding blocks from your library.
3. **Open an existing project** -- select any previously saved project from the Projects list in the left sidebar.
[Learn more about creating projects](/creating/new-projects)
## Block-based editing
Projects in Denada are built from **blocks**. Each block is a self-contained section -- a hero image, a text section, a call-to-action button, a footer, and so on. Blocks expose **parameters** that you can edit, such as:
* Headline and body text.
* Images and alt text.
* Button labels and URLs.
* Background colors and spacing.
To edit a block, select it in the preview area or choose it from the blocks list in the **Edit** tab. The sidebar will display all of the editable parameters for that block. Your brand guidelines determine which parameters are exposed -- style properties that should stay consistent are locked down by the project's library.
You can reorder, add, or remove blocks to change the structure of your project. Look for the block controls in the Edit tab.
## Sidebar tabs
The right sidebar contains several tabs:
Continue your conversation with Denada without leaving the editor. Ask for changes, request new sections, or refine the project through natural language. Denada applies changes directly to the project in the preview area.
[Learn more about the chat interface](/creating/chat-interface)
Browse and manage the blocks that make up your project. Add new blocks from your library, reorder them, or remove blocks you do not need. Select a block to see its editable parameters -- text, images, links, colors, and more.
[Learn more about working with blocks](/editor/working-with-blocks)
Generate multiple versions of your project automatically. Variations let you explore different copy, tone, or layout options and export them all at once for translations, personas, or A/B testing.
[Learn more about variations](/editor/variations)
Leave internal notes for your team or collect feedback from external reviewers. Comments can be tied to specific blocks and toggled between public and private visibility.
[Learn more about comments and collaboration](/editor/comments-and-collaboration)
Project-level settings: the subject, preheader, and UTM tracking for email projects, theme parameters, version history, and the library your project is built on.
[See the full Options reference](/editor/project-options)
## Preview layouts
The **⋯** menu's **Preview layout** submenu switches the preview between four breakpoints:
* **Responsive** (default) -- the preview fills the available width of your editor window.
* **Desktop** -- fixed 1280px-wide preview.
* **Tablet** -- fixed 800px-wide preview.
* **Mobile** -- fixed 375px-wide preview.
Press Cmd+Shift+F (Ctrl+Shift+F on Windows) to cycle through the layouts without opening the menu. This is especially useful for checking that images, text wrapping, and button sizing look right across screen sizes.
### Above the fold
Toggle **Above the fold** in the **⋯** menu (or press Ctrl+F) to overlay dashed guides showing roughly how much content is visible before scrolling. For email projects, the guides mark the approximate fold in popular clients like Apple Mail, Gmail, and Outlook, on both desktop and mobile. For landing pages, the guides reflect common browser window sizes instead.
For email projects, the same toggle also covers the envelope: when your subject line or preheader runs longer than a client typically displays, a dashed marker labeled with the client's name appears at the cutoff point in the header above the preview. The markers follow the selected preview layout, so switching to **Mobile** shows you where mobile inboxes would truncate your subject.
Treat all of these guides as a gut-check, not a guarantee -- real clients vary by device, window size, and version.
## AI chat in the editor
You do not have to leave the editor to make AI-powered changes. Switch to the **Chat** tab in the right sidebar and ask Denada to update your project -- for example, "Make the headline shorter" or "Swap the hero image for something with a blue background." Changes are applied directly to the project in the preview area.
## Sharing and exporting
When your project is ready, click the **Share** button in the toolbar. From there you can publish to the web, send proof emails, export in multiple formats (image, PDF, ZIP, CSV, JSON, Figma), copy or save the HTML, and push directly to connected email platforms.
[Learn more about export formats](/exporting/export-formats)
Once you are in the editor, you are in full control. Denada will not make changes to your project unless you explicitly ask it to through the Chat tab.